This chapter describes how to create new groups and modify these groups to effectively meet your monitoring needs. This chapter contains the following sections:
- Overview
- Naming your group
- Calling and monitoring parameters
- Adding a phone number (or numbers)
- Phone number actions
- Bulk actions
- Group actions
Overview
Groups allow you to organize your phone numbers so that you have more flexibility and can better manage multiple entities. (i.e. you may have individual departments, offices or perhaps entire businesses that you would like to treat separately)
By creating multiple groups you can call one block of numbers from 8am – 5pm while calling a different block of numbers from 9am – 7pm. Or perhaps you have two numbers in different time zones and you would like to call them from 8:30am – 5:00pm according to their local time. Making one group for each of these numbers would allow you to do this. There are many other reasons in which your phone numbers may require different call treatments and as you read the following sections it will become much clearer.
Here is what the group template looks like.
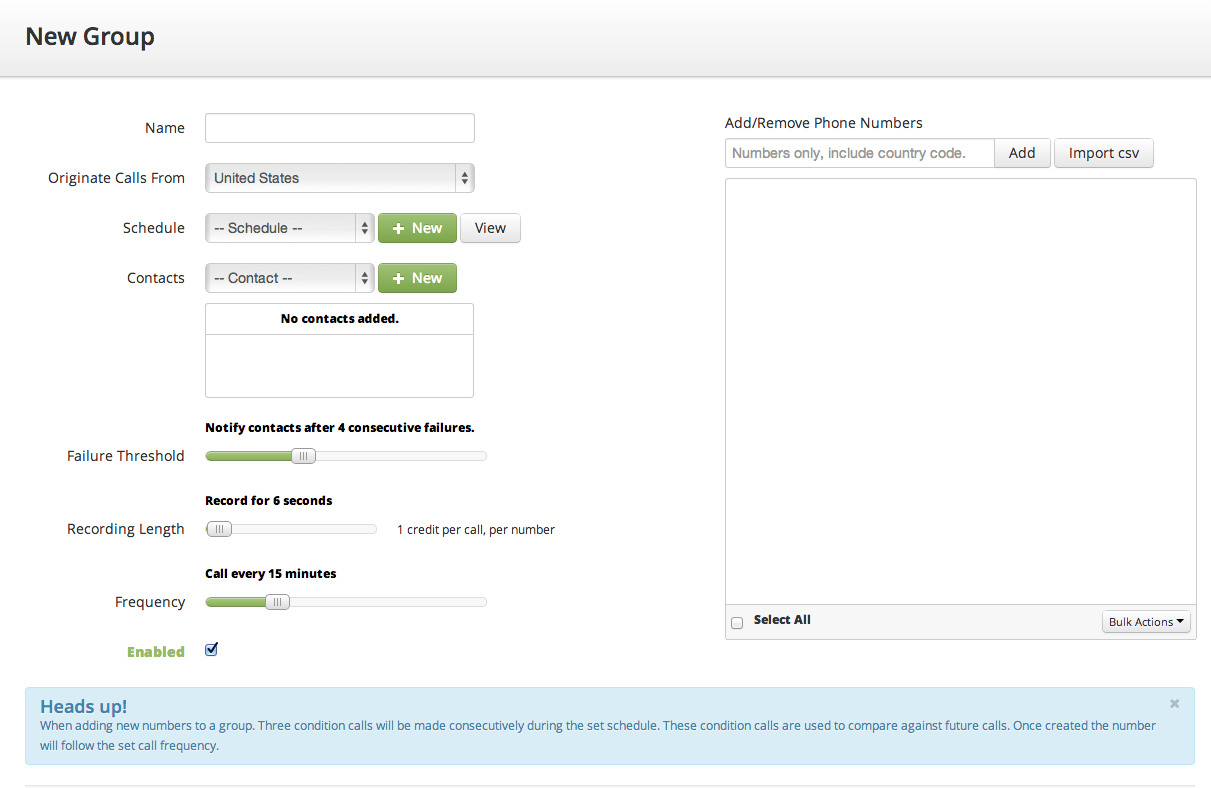
Naming your group
Use a descriptive name for your Group such as “Marketing” or “Chicago Office” so that you will be able to identify it easier.
Calling and monitoring parameters
Originate Calls From – This controls where your monitoring calls will be made from. Currently Tiksoo can call your phone number from either Canada or from the U.S.A.* Therefore, if your customer base is in the U.S.A. then this feature will ensure Tiksoo is using a Telco in the U.S.A. to make calls to your business. The same goes for if your customer base is in Canada and that is where you would like calls to originate from.
Schedule – This is where you will select a schedule that Tiksoo will follow when
monitoring your phone number(s). (Refer to Section 2 for creating Schedules)
Contacts – This is a list of people that will be notified should a failure occur on any phone number (or numbers) in this group. (Refer to Section 3 for creating Contacts)
Failure Threshold – This is the amount of times that a failure has to occur in order for Tiksoo to notify you. This feature might seem odd because in almost all cases you would want to be notified if even a single failure occurs. However, we give you the option so that you can increase this threshold when abnormal situations arise such as your phone line hasn’t necessarily “failed” but perhaps one call out of every 10 or 20 results in an oddity such as static or low volume, etc... and for the duration that it takes for your Telco to identify and correct the problem you can set the threshold higher so that you won’t get any false positives.
Recording Length – We have a default recording length of 6 seconds as that is a good amount of time to record a consistent sample of your Auto Attendant/IVR. In some cases you may wish to adjust it so that it is taking a shorter or even longer sample. For instance, a longer sample may be desired if you have 2 phone numbers that share a generic prompt for the first 7 or 8 seconds of the call, and then each phone number continues on to play a second recording that is different from the other number. In situations like this you would like to increase the recording length so that it records a long enough sample to capture the difference between the two numbers.
Shorter recording lengths might be used to keep the call down below the 6 second mark in duration as that is when many Telco’s begin to bill you.
Frequency – The frequency specifies how often you would like Tiksoo to call your number. If your number is extremely important you may want to call it rather frequently such as every 1 minute, however if it is a number that has low call volume and is not vital to your customer base or SLA’s then you may wish to call it only once an hour.
Adding a phone number (or numbers)
Adding a number is easy, type it in the text below where it says ” Add/Remove Phone Numbers” and click the “Add” button. *NOTE: even if you are entering a local 10 digit phone number Tiksoo will put a 1 in front of it, this is normal behavior and can be ignored.
If you have a large amount of numbers, you can save time by importing them using a CSV file. Simply click the button labelled “Import csv” then browse to your file, select it and click “Open”
Phone number actions
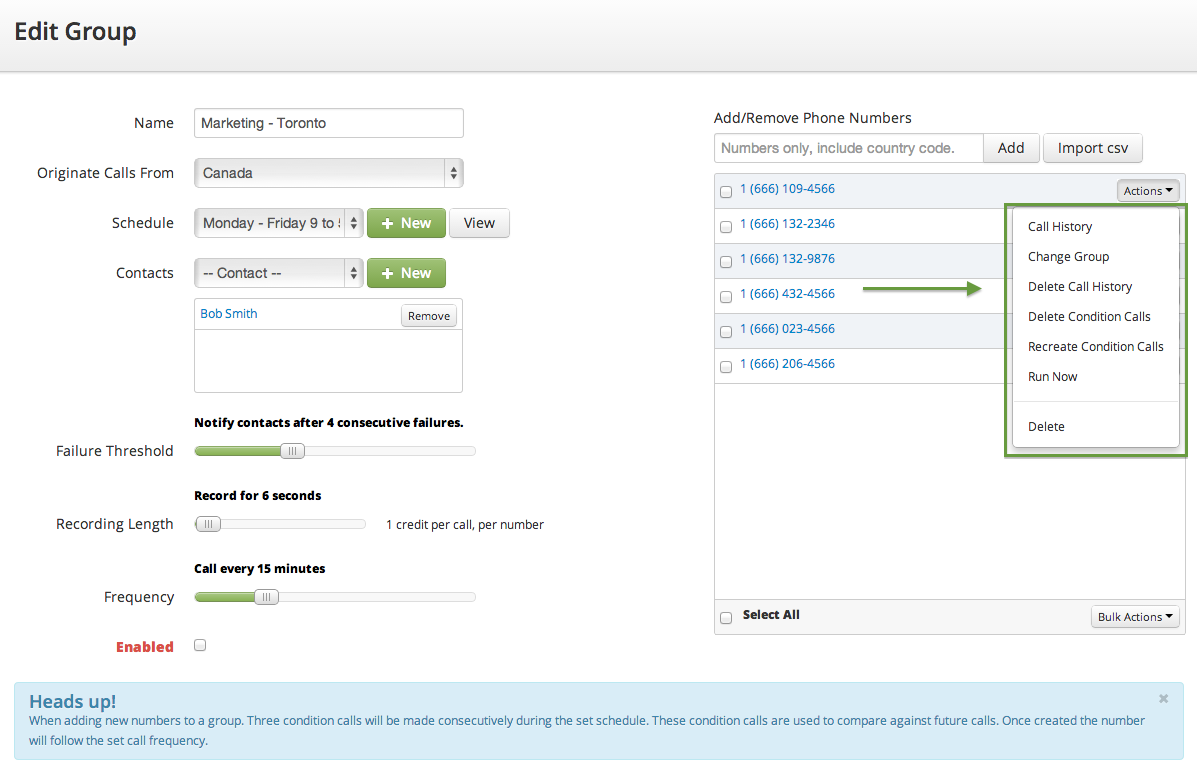
When you click the “Actions” button located beside a phone number it will display a list of available actions that you can perform on that number. Here are the available options:
Call History – This takes you to a page that will show you all the calls that have been made to this number as well as statistics about each call (see section 6 for more information on Call statistics)
Change Group – This will move the phone number to a different group
Delete Call History – This will delete all records of any calls that have ever been made to this number from Tiksoo; it will be treated as newly entered number once you do this.
Delete Condition calls – This will remove the 3 existing condition calls. This is valuable if you make a change to this phone number so that the Auto Attendant has been changed.
Recreate Condition Calls - This works hand and hand with the “Delete Condition calls” action, once you have changed one of your phone numbers and deleted the conditioning calls you will use this action to make Tiksoo recognise the new Auto Attendant recording by making 3 new conditioning calls.
Run Now – This action will run a one-time test on this particular number. (Refer to section 5 for more information on “Run Now”)
Bulk actions
You can select multiple numbers within a group by checking off the check box to the left of each number that you would like the action to be applied to. Click the “Bulk Actions” button, and the action that you choose (same as the actions described above) will be applied to all of the selected numbers rather than just one single number.